How to Get Rid of Thrips on Roses Organically

thrips on roses

The Game Plan: Think Like a Predator, Not a Pest Controller

Let me tell you about the summer I nearly lost my mind to thrips. There I was, proudly showing off my prize-winning ‘Double Delight’ roses to the neighbor, when she leaned in and said, “Honey, why do your white petals look like they’ve been scratched by a thousand tiny cat claws?”
Thrips. The invisible enemy. If you can’t see them but your roses look like they’ve been through a paper shredder, congratulations, you’ve got thrips.
These microscopic vampires are barely 1/50th of an inch long (think: splinter with wings), and they’re basically the cockroaches of the flower world. One day your buds are plump and perfect; the next, they’re streaked with silver, browned at the edges, and twisted like something out of a gardening horror film. Western flower thrips are the usual suspects, but if you’re in the South, watch out for chilli thrips. These invasive monsters will strip your roses bare and leave them looking like they’ve been torched.
The worst part? They hide. Deep inside your rose buds, where sprays can’t reach, laughing at you while they suck the life out of every petal. With 20+ generations per year and a life cycle of just two weeks, they reproduce faster than gossip at a garden club meeting.
But here’s the good news: I beat them. Without a single synthetic chemical. And my roses have never looked better.
thrips on roses

The secret to organic thrips control isn’t one magic bullet; it’s building a system where thrips simply can’t win. Think of it as assembling a heist crew, where every member has a specialty.

Step 1: Hire the Muscle (Predatory Mites)

This is where I started, and honestly? It’s the single best decision I made.

Meet Neoseiulus cucumeris, or as I call them, my tiny assassins. These predatory mites are thrips-eating machines, but here’s the critical part: you have to bring them in BEFORE you see thrips. This is preventive warfare, not emergency surgery.

I hung slow-release sachets in my rose bushes in early spring, tucked right into the canopy where they get dappled shade, not baking sun. (Research from the University of Florida shows these sachets turn into death ovens if they’re in direct light, high heat, and low humidity kill the eggs.) Each sachet lasts 4-6 weeks and releases a steady stream of predators.

For established beds, I also added Amblyseius swirskii, a heat-tolerant mite that thrives when summer turns brutal. Recent research shows these guys move fast and eat even faster, especially when you give them nearby habitat plants. They need the shelter and alternative food sources that roses (with their slick leaves) just can’t offer.

Pro tip from my trial-and-error: Place one mini-sachet per hanging basket, or 1-4 per tray of potted roses. If you’re dealing with a full-blown infestation already, bring in the special forces: Orius (minute pirate bugs) at one bug per plant. These guys are thrips-hunting ninjas.

Garden tips

Place one mini-sachet per hanging basket, or 1-4 per tray of potted roses. If you’re dealing with a full-blown infestation already, bring in the special forces: Orius (minute pirate bugs) at one bug per plant. These guys are thrips-hunting ninjas.

Step 2: Plant Yarrow Your Beneficial Insect Magnet

This discovery changed everything for me. Instead of chasing thrips around my roses, I started attracting their natural enemies using plants that beneficial insects can’t resist.
I plant yarrow (Achillea millefolium) in abundance throughout my garden, tall drifts of white, yellow, and pink blooms that wave above my rose bushes from June through September. Here’s why this works: yarrow’s flat-topped flower clusters are basically all-you-can-eat buffets for lacewings, ladybugs, parasitic wasps, hoverflies, and minute pirate bugs, all voracious predators of thrips.
 
rose Companion Plants
The research backs this up. Yarrow provides:
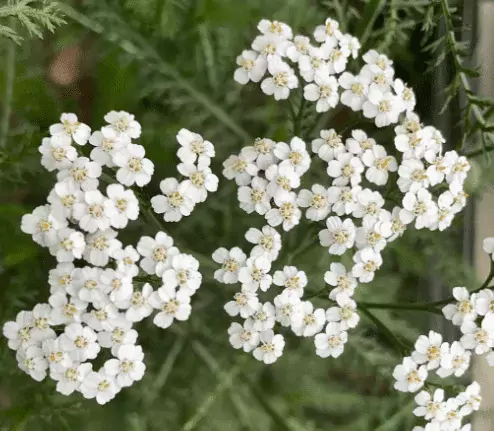
  • Nectar and pollen for adult beneficial insects, keeping them in your garden longer
  • Shelter for predatory mites and other tiny hunters
  • Alternative prey when thrips populations are low, so your beneficial army doesn’t starve and leave.
I plant yarrow every 6-8 feet throughout my rose beds, plus along the borders. The lacewings alone are worth their weight in gold. Their larvae are called “aphid lions,” but they devour thrips just as eagerly, sucking them dry like tiny vampires. I’ve watched hoverfly larvae (those little green maggots you find on leaves) clean out a thrips colony in just a few days.
The beautiful thing? Yarrow is drought-tolerant, perennial, and basically bulletproof once established. It improves soil drainage with its deep roots, attracts pollinators to boost my rose hips, and creates this gorgeous wildflower meadow aesthetic that makes my formal roses look even more romantic by contrast. Plus, I cut armfuls of dried flowers for dried flower arrangements all winter.
Lacewings in rose garden

Step 3: Deploy the Fungal Assassin (Beauveria bassiana)

Okay, this is where we get into some serious biological warfare in the coolest way possible.
Beauveria bassiana is a naturally occurring soil fungus that acts like a horror-movie villain to insects. The spores stick to thrips, germinate like tiny alien invaders, and literally eat their way through the insect’s body. Research published in 2021 showed that the strain Beauveria bassiana killed 81% of adult western flower thrips within 6 days. Eighty-one percent!
I use it in two ways:
Soil drench: Granular formulations applied to the soil surface target thrips when they drop down to pupate (which 70% of them do this is their vulnerable moment. Studies show a 70% reduction in population after 8 weeks. It’s like mining the harbor so enemy ships can’t dock.
Foliar spray: When I see the first signs of thrips, those telltale silver streaks, I spray B. bassiana directly on the terminals and buds. You need thorough coverage because this is a contact killer, but it won’t harm bees, butterflies, or your predatory mites.
Heads up: Don’t use this if you’ve released ladybugs; they’re not compatible. Check online compatibility charts (Koppert and Biobest have great databases) before mixing your biological crew.

Step 4: The Heavy Artillery (Neem Oil Rotation)

Sometimes, despite your best prevention efforts, thrips explode overnight. Maybe you went on vacation. Maybe the weather turned out to be perfect for thrips breeding. Maybe you just blinked. This is when I reach for neem oil, but strategically and persistently.
Neem oil (azadirachtin) is my go-to curative treatment. Research from UC Davis shows it works more slowly than some conventional options, but it’s genuinely effective when used correctly. The key is rotation and repetition, as thrips reproduce too fast for single treatments.
 
Here’s the protocol that actually works: Apply neem oil every 5-7 days for 3-4 consecutive applications. Not once. Not twice. You need that schedule because thrips hide in buds where sprays miss, and their life cycle is just two weeks. You’re hitting multiple generations.
I mix neem oil with insecticidal soap or a small amount of horticultural oil to improve coverage and persistence. The soap breaks surface tension, so the neem penetrates leaf crevices; the oil helps it stick around longer.
Critical timing: I spray in the early morning or evening when bees aren’t active, and I avoid open flowers when possible. Neem is relatively bee-safe once dry (unlike some alternatives), but I still exercise caution. I also pause applications when ladybug larvae or lacewings are visibly active on the plants. I don’t want to disrupt my beneficial army.
Research shows that combining neem with increased releases of predatory mites creates better long-term control than either approach alone. The neem suppresses the outbreak; the predators maintain the peace.

Step 5: Monitor Like a Detective

You can’t manage what you don’t measure. I learned this the hard way after assuming “no visible thrips” meant “no problem.”
Blue sticky traps are your best friend here. Research confirms blue catches more thrips than yellow, though the little buggers are harder to see against the background. I hang them at plant level, about 7 feet apart, and replace them every 3-4 weeks before the glue dries out.
But traps alone lie. You need to inspect your plants weekly with a 10-15x hand lens. Check the buds, the flowers, the leaf axils, especially the tight inner petals where thrips love to hide and party. Look for:
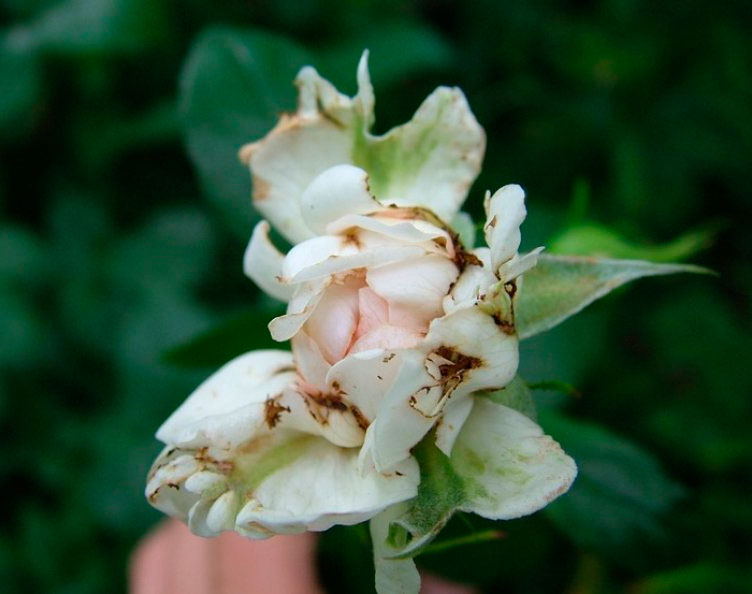
  • Silvery streaks on petals
  • Black specks (thrips poop charming, I know)
  • Distorted or browned flower edges
  • Deformed new growth
Early detection means you can spot-treat with insecticidal soap or kaolin clay before you need the heavier artillery.

What I Learned the Hard Way 

Don’t waste your money on: Essential oils as standalone treatments. I tried rosemary, peppermint, thyme, and garlic sprays because they sounded so natural and lovely. Research shows they provide less than 30% control, basically expensive plant perfume. Use them if you want, but don’t rely on them.
Pyrethrin is a trap: It knocks thrips down quickly, but they often recover, and its residual activity lasts only hours, not days. You’ll be spraying every other day until you go mad.
Soil matters more than you think: 70% of thrips control occurs there. If you’re only spraying leaves, you’re missing the pupal stage that drops down and regenerates your infestation. Diatomaceous earth sprinkled on the soil surface works here; the razor-sharp silica damages thrips exoskeletons as they try to pupate. Just use food-grade and apply when bees aren’t active.
Nitrogen is a thrips fertilizer: I was over-fertilizing with nitrogen-heavy organic fertilizers, thinking I was helping my roses. Turns out lush, nitrogen-rich growth is thrips paradise. I switched to balanced compost and saw immediate improvement in pest pressure.
 
Saving Roses From Thrips Organically

My Double Delight rose

My Seasonal Battle Plan

Early Spring (Before Bud Break):
  • Hang blue sticky traps.
  • Apply Stratiolaelaps scimitus to soil (these soil-dwelling predatory mites attack thrips pupae)
  • Plant yarrow seedlings throughout the garden (if not already established)
  • Release Neoseiulus cucumeris in sachets throughout the rose canopy.
Late Spring (First Growth):
  • Begin weekly plant inspections.
  • Apply Beauveria bassiana granules to the soil.
  • Spot-treat any early arrivals with insecticidal soap.
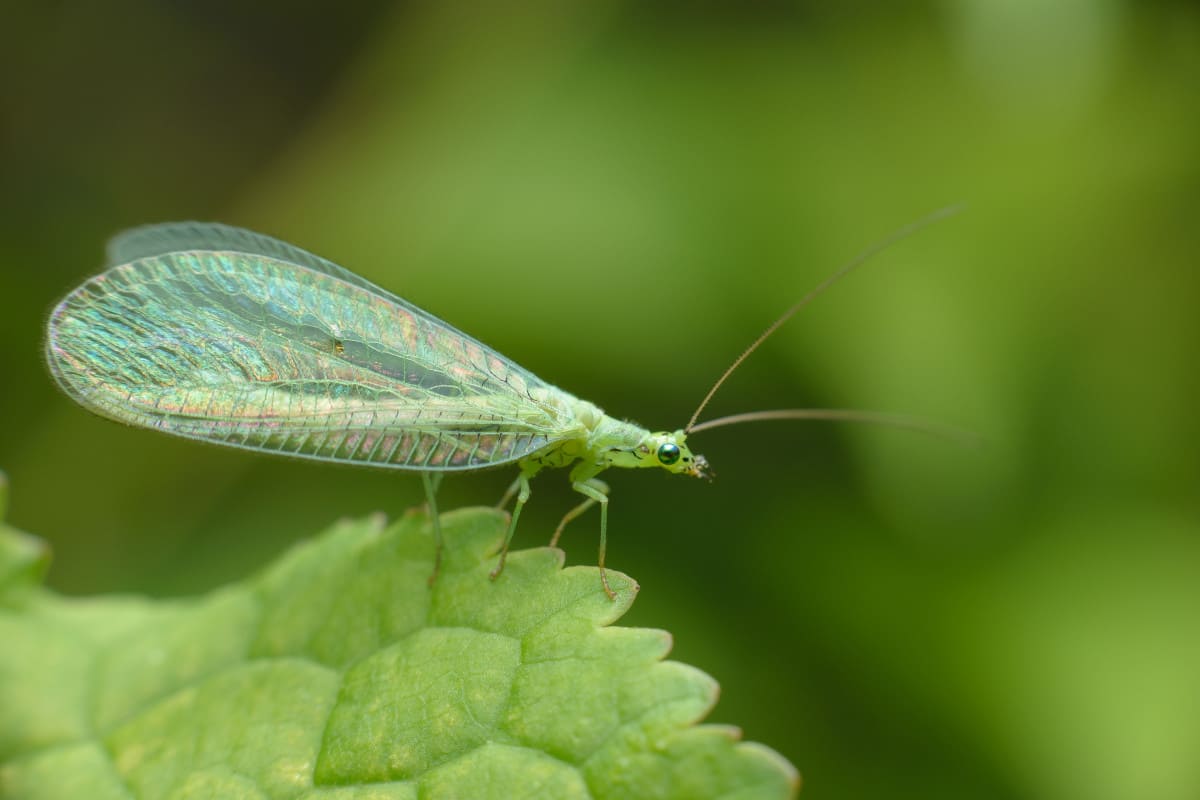
  • Watch for lacewing eggs on yarrow (tiny white stalks with green eggs—celebrate when you see them!)
  • Keep monitoring traps
Summer (Peak Season):
  • Maintain kaolin clay applications every 5-7 days.
  • Replace predatory mite sachets as needed (usually every 4-6 weeks)
  • Deep irrigation, avoid excess nitrogen.
  • Remove spent blooms promptly (but not obsessively—some shelter beneficials too)
  • Cut yarrow back by one-third after the first bloom to encourage fresh growth and extend the buffet for beneficial insects.
Fall (Preparation):
  • Continue monitoring until the first frost.
  • Final soil treatment with B. bassiana or diatomaceous earth
  • Let yarrow stand for winter—birds eat the seeds, and beneficial insects overwinter in the stems.
  • Clean up severely infested rose debris.
  • Plan next spring’s prevention strategy.

The Payoff

Two years after implementing this system, my roses look magnificent. I haven’t used synthetic chemicals for 24 months. The beneficial insect population is incredible. I see swarms of lacewings hovering over the yarrow at dusk, ladybugs patrolling the leaves, and hoverflies scurrying everywhere. Thrips? I don’t see them. Something must be constantly eating them. They’re under control. I’m part of the ecosystem, not destroying it.
The secret isn’t in finding one magic organic spray. It’s about creating a system where thrips can’t win, where predators outnumber pests, where healthy soil interrupts the life cycle, where physical barriers block invasion, where yarrow serves as food for your army of lacewings, and where you remain vigilant without panicking.
Your roses deserve better than chemical warfare. They deserve an ecosystem that naturally protects them. And honestly? You do too. There’s something deeply satisfying about solving this conundrum organically, about understanding your garden as a living system, not a chemical experiment.
Now go plant some yarrow and release the mites. Your roses and native lacewings are counting on you.
 
If you want to learn the full structure of this system – including 100 detailed reasons why roses aren’t blooming read “Why doesn’t My Rose Grow and Bloom?” It takes the guesswork out of it.
If you want to properly track timing, treatments, and seasonal patterns, use the “Rose Garden Planner 2026.” Thrip control improves significantly when you record what’s actually happening.
And if you want to understand why organic systems based on soil-based cultivation outperform spray methods in the long run, start with the “Revolution in the Rose Garden” program.
That’s the first step. Without structure, every treatment feels random.

Rose gardening books

Step into a calmer, more confident rose season. With Ann Devis’s rose gardening books and planner, you’ll get simple organic routines, proven tips, and checklists that keep your roses thriving – from first bud to last bloom.

Frequently Asked Questions

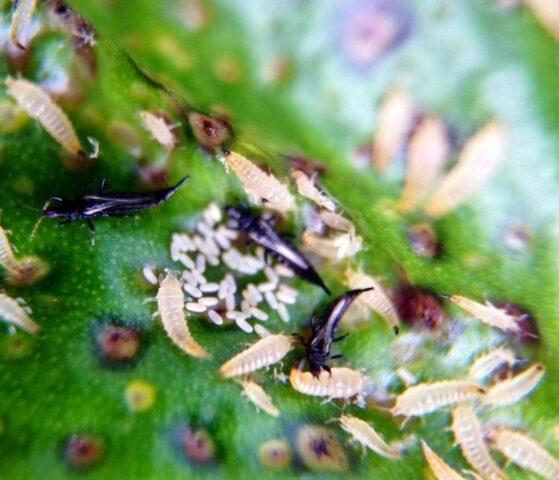
1. How do I identify thrips on my roses?

Look for silvery or bronze streaks on petals and leaves, distorted or unopened buds, and tiny black specks of excrement on the surface. Thrips are around 1 mm long and slender and may flutter away if disturbed.

2. What should I do if beneficial insects don’t establish in my garden?
If predatory mites fail, the problem is almost always environment, timing, or residue.
Most gardeners release mites into dry air, hot sun, or a garden that was just sprayed clean. Then they assume the product failed. It didn’t. The conditions did.
Predatory mites need warmth and humidity. Dry heat kills eggs fast. Place sachets inside the shaded lower canopy, not on exposed tips. Light morning misting can help in very dry climates, but never leave foliage wet overnight.
Timing matters just as much. If you eliminate every thrips with soap before releasing predators, they starve. Release when you see the first signs of damage — not during a full infestation, and not after you’ve wiped everything out.
Past pesticide use can quietly sabotage you. Some systemic insecticides linger in plant tissue for over a year. If you used them recently, switch to Beauveria bassiana and physical barriers for a season before trying predators again.
And then there’s patience. Predator populations need weeks, not days. Check too early, and you’ll think nothing is happening.
If one species fails, change species. Amblydromalus limonicus establishes faster in variable temperatures. Stratiolaelaps scimitus works in soil and targets the pupal stage. Match the predator to the gap.
3. Are these organic treatments safe for pets, children, and edible plants?
Yes — when used correctly.
Predatory mites are harmless to people and pets. They don’t bite and can’t survive without insect prey.
Beauveria bassiana infects insects only. It won’t harm mammals or birds. Avoid inhaling the spray mist during application and keep pets out until it dries.
Kaolin clay is food-grade. It’s used on commercial fruit crops. Once dry, it’s inert.
Neem oil and horticultural oils are safe after drying, but the concentrated spray can irritate skin or upset a pet’s stomach if ingested. Keep animals away during application.
The real difference is persistence. These methods don’t accumulate in soil or create long-term toxicity. That’s what makes them workable in family gardens.
Organic still requires correct use. “Natural” is not a permission slip for careless application.
4. How do I adjust timing for my climate?
Ignore the calendar. Watch the plant.
Release predatory mites at leaf break — when new red growth starts to open — and night temperatures stay consistently above 50°F. Thrips arrive shortly after.
Install reflective mulch right after pruning, before full leaf-out. It only works while light can reach the base of the plant.
Apply Beauveria bassiana when soil temperatures reach about 60°F and stay there. Cold soil slows it down.
Start kaolin clay at the first visible thrips damage — silver streaks or distorted buds. Stop when pressure drops.
If your climate is hot and dry, humidity support becomes critical, and heat-tolerant mite species perform better. In cool, wet climates, fungal controls often outperform physical barriers. In humid subtropics, you need early intervention and consistent pressure management. In cold-winter regions, use the natural winter reset and focus on spring prevention.
The universal tool is a blue sticky trap. Hang it at leaf break. When you catch thrips, your system activates. That timing is specific to your garden — not someone else’s zone.
5. Will this system work in containers?
Containers are often easier.
You control the soil volume, spacing, and isolation. One sachet of mite per pot is usually enough. Group containers together to raise humidity.
Yarrow doesn’t require space — one plant nearby can support beneficial insects. In very small spaces, choose compact varieties.
Beauveria bassiana is actually more thorough in pots because you treat the entire root zone. Just monitor soil temperature; containers heat up faster than garden beds.
Reflective mulch is rarely practical in containers. Light-colored gravel or surfaces can provide partial reflection.
Monitoring is simpler, too. Rotate pots. Inspect regularly. Isolation allows you to treat one plant without affecting others.
The only real limitation is indoor growing. Predatory mites struggle in dry indoor air. In that case, rely on soil-applied Beauveria and consistent manual monitoring.

Leave a Comment

Sign In

Register

Reset Password

Please enter your username or email address, you will receive a link to create a new password via email.

Scroll to Top